

How To Charge Stadia Controller
Meet the Stadia Controller
You can use the Stadia Controller to play games on Stadia, navigate menus, capture screenshots and video clips, and more.


Buttons and controls
Notation: When yous link a Stadia Controller to a uniform Boob tube, the controller can merely be used to navigate the Stadia app. To navigate other sections of your TV interface, connect a Bluetooth controller or use the Television remote that came with your device.
Stadia button 
The Stadia push button is used to turn on the Stadia platform and access menus. It has a built-in status light.
| To practice this... | Practice this |
|---|---|
| Turn on the Stadia platform | Press and concur the Stadia button Annotation: Before you lot turn on Stadia, you must link your controller to the screen yous want to employ. |
| Open up the Stadia menu
| Quickly press the Stadia button |
| Open up the Stadia platform menu
| Printing and agree the Stadia push button |
| Turn off the controller | Press and hold the Stadia button for 4 seconds. |
| Re-enter linking manner | When the Stadia Controller is off, press and hold the Stadia push button Note: This can exist useful when switching screens wirelessly to another device. For example, when switching between your TV and computer. |
| Turn off the controller (hard ability downward) | Printing and hold the Stadia button To plough the controller back on, printing and hold the Stadia button |
Gameplay controls
| Face buttons A push B button X push button Y push | The face buttons are used for different actions, depending on the game you're playing. Actions may include running, jumping, or interacting with objects. |
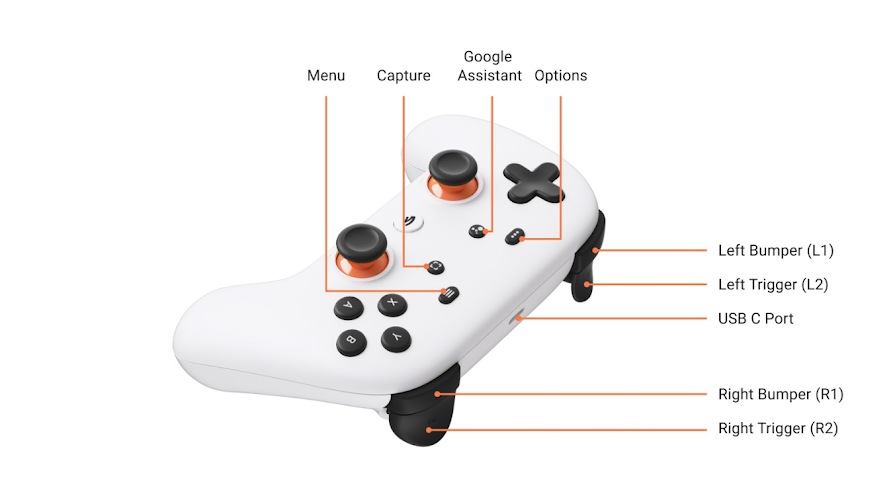
| Shoulder buttons Left bumper (L1) Left trigger (L2) Right bumper (R1) Right trigger (R2) | The shoulder buttons are the bumpers and triggers located on the meridian of the Stadia Controller. They're oft used for actions similar shooting, throwing, or controlling vehicle throttle and brakes. The triggers are analog, so games can tell how far downwards you press them. They're used in games that require a variable amount of pressure, like racing games that simulate gas and brake pedals. |
| Direction pad Up Down Left Right | This 8-directional D-pad is used to perform directional actions (up, down, left, correct, or diagonal). The D-Pad is used for menu selection, moving your grapheme, or for fighting game deportment and combos. The D-Pad may exist used differently depending on what game you're playing. |
| Direction sticks Left stick Right stick | The Stadia Controller has two 360° sticks. They're commonly used to move your character or motility the photographic camera view. Either stick tin exist pressed like a push. These "buttons" are called L3 and R3. Like other buttons, L3 and R3 have dissimilar uses, depending on the game you're playing. |


Other buttons
Ports
Notation: Stadia does not currently support headphone or headset connections via Bluetooth.
three.5mm headphone jack and microphone
- The 3.5mm headphone jack is located on the bottom of the Stadia Controller. You can plug wired headphones into the controller to listen to your game. The headphone jack works with headphones with or without a built-in microphone. If your headphones have a microphone, you tin speak into it to use vocalization chat and Google Assistant on Stadia.
Note: When using the headphone jack, you will not be able to play sound from your TV, figurer, or mobile device. - The Stadia Controller has a microphone near the headset jack. With Google Assistant enabled, the mic volition plow on when you press the Assistant button. When you can speak to the Assistant, the status lite on your controller volition blink in a series of 2 short flashes followed past a pause. Yous'll as well see an Banana indicator on the screen where you're playing.
- When you plug a headset into your Stadia Controller and printing the Assistant button, you lot'll accept to speak to the Assistant using your headset'due south microphone.
- Note: When you lot connect your Stadia Controller to your Android mobile device or link to information technology wirelessly, you lot should be able to receive and respond to in-game voice chat or political party conversation when you connect a headset with microphone to your controller. You lot can also use Bluetooth or a USB cable to connect a headset to your Android mobile device.
- The PlayStation® DualShock®four Controller also supports audio input and output via a headset continued to the iii.5mm sound jack. For all other supported controllers, including mouse and keyboard, headsets must be continued directly to the computer or phone for audio input and output.
USB-C® port
- To charge the Stadia Controller'southward battery, use a USB-C cable to plug it into a power adapter or a USB port on a computer.
- For wired play, apply a USB-C cable to connect the Stadia Controller to a computer or compatible mobile device.
- If a USB-A to USB-C cable is used to connect to a computer, the USB-C side must be connected to the Stadia Controller. Connecting the USB-A side to the Stadia Controller via an adapter is not recommended.
- To accuse your Stadia Controller during wireless gameplay on your TV, plow on the controller and link information technology to a Goggle box screen, then plug it into a ability adapter or your reckoner'southward USB port. To accuse your controller during wireless gameplay on your estimator or mobile device, plug it into a power adapter.
- For game sound and vox conversation, plug a USB headset into the USB-C port on your controller.
- Libratone Q Adapt USB-C Earphones are not uniform with the Stadia Controller.
- AIAIAI TMA-2 MFG4 On-Ear headphones tin only be used with a 3.5mm cablevision.
- Use a USB-C cable to connect the Stadia Controller to some other controller in Tandem Way.
Critical software updates to your Stadia Controller
When critical software updates are released for your Stadia Controller, they will be practical automatically when information technology connects to Wi-Fi. Here's how it works:
- Press and hold the Stadia button
- The Stadia push button will slowly blink white for approximately 12 seconds while it connects to Wi-Fi.
- The Stadia push button will glimmer orange and white while it applies the critical update. During this fourth dimension you lot won't be able to use your controller.
You tin can as well bank check if your Stadia Controller software is being updated:
- On your mobile device, open up the Stadia app
.
- Tap the Controller icon.
Afterward whatsoever updates finish, your Stadia Controller volition restart and the Stadia button will slowly blink white again for approximately 12 seconds while it reconnects to Wi-Fi.
PLAYSTATION and DUALSHOCK four are registered trademarks of Sony Interactive Entertainment Inc.
USB-C is a registered trademark of USB Implementers Forum.
Was this helpful?
How tin can we improve information technology?
Source: https://support.google.com/stadia/answer/9565956?hl=en#:~:text=To%20charge%20the%20Stadia%20Controller's,computer%20or%20compatible%20mobile%20device.
0 Response to "How To Charge Stadia Controller"
Post a Comment